Merry Christmas Everyone!!!!!!!!!!!!!
Ayayayayay!!!! Ive been pretty ill recently, all this cold weather and snow is probably to blame. Anyhoo Im feeling better now so lets go enjoy the snoooooow!!!!!! ^_^

For the AIB Jumble blog. Buuuut unfinished!!!!!!! :'( I have actually had one of those moments where Ive been looking at this for too long, without a clear direction of what I wanted to do with the colours and messed around with it too much that I lost some of the motivation for this one. Soooo the plan is to just leave this by the side for a while, let it rest and come back to it fresh in a future date. Painting and drawing isnt always second nature to me, there is still a lot of struggle and problem solving for every piece. I believe its like this for a lot of artists even well established ones too so dont feel bad for hitting one of these snags. We just need to keep ploughing forward, people may not see the amount of effort in clearing the snowy path but they will see the finished result of the clear pavement! ;)

You know, its been a while! I almost forgot about this little section of my blog and hearing some positive feedbacks about this reminded me to keep it up. If you have something you would like me to try explain do ask away!
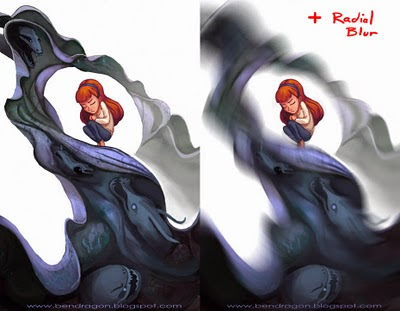
Anyway, this is quite a simple trick. Im sure a lot of people may know this already but I didnt until recently :P I was trying to make a motion blur at work one time and wasnt very successful so I asked a colleague to help me out and he showed me how to use a radial blur to add motion blurs. Simply copy the whole image (ctrl+shift+C to copy all layers) and then apply a radial blur filter via the topbar Filter>Blur>Radial Blur. A window will open up where you can pick the center of where you want the circular motion to originate from. This might take a few trials and error to get it to look correct but once it does, just erase away parts of the blur to reveal the original image underneath it.
Just got this delivered today. Ballistic Publishing Exotique 6 showcases this year's selection of digital character art from both 2d and 3d. Again, I want to thank Paul Hellard and his team at Ballistic Publishing for selecting my work a second time. I hope I can build on this and reach greater heights.

So here are the two Ballistic books I have found myself in. Its quite an odd feeling, hasn't really sunken in yet I dont think. Again, I remember where I came from (learning to paint and facing many failures and struggles) so Im determined to keep that going and I hope you all too XD

A friend of mine requested for a lil tutorial for the Santa piece. And when you ask, you receive :D
So first off I started out with some thumbnails. It is very easy to underestimate how much you can solve with thumbnails. It is a quick way to design and see what works and what doesnt without investing too much into the final piece and then finding these issues. One I found a design I like I enlarged the thumbnail and drew over the top of it.
In stage 2 I simple coloured the drawing in. I used a round brush with spacing set to 20% with size jitter and opacity set to pen pressure. I didnt want to go for a fully rendered painting look but let the drawing do most of the work and have loose paint work done. So I didnt mind having some patches where areas are not fully coloured in, almost like they are just washes of colour but I did add a few tones in there to slightly help sell the form. The green pattern in the background is a stamp brush that made that diagonal slash which I then ran through a halftone filter to get the spots.
Theeeeen I grabbed a photo of some watercolour washes from the internet and put it over the top of the image as an overlay layer. I lowered the saturation of this texture as not to affect the existing colours too much. And I altered the levels to make sure the contrast is lower and wouldn't affect the ones I established too. And voila! Done and done! :)