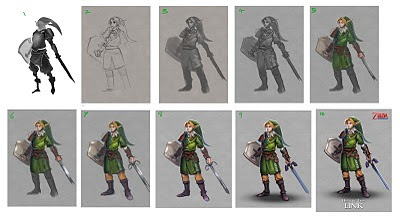
Its been a while since Ive done some tutorials and shared some information. Lets take a look at the Legend of Zelda painting. I saved a few steps so that i could go back to them but towards the end I worked on the same file so there is a sudden jump in the rendering. I usually save new files for big changes and usually these happen near the start, the reason the last parts jump in rendering is because a lot of the problems are already solved in the beginning so that I feel confident enough to just work in one file. Here we go...
1) Started off with some thumbnails, focusing on silhouette with some slight suggestion of what the details could be. 2) With the thumbnail chosen I began drawing the proper piece. But I am not liking it very much, the face is bad and the chest is flat. 3) So I lowered the opacity of the drawing and began to draw over it on a new layer. I threw on some hints of value help me keep an eye on the silhouette. 4) Drawing done! Now I have a stronger direction of what to do. With the anatomy put down that is one less to think about. The design is mostly solved in the drawing which is yet another thing I can worry less about. The lighting is suggested here with some basic values. when I colour a grayscale I dont bother to get tight with the black and white values as they will eventually be changed by the colouring layers anyway. From experience I tend to find it best to keep the value drawing low in contrast and leave yourself room to change the contrast later. Layers like overlay and multiply can push your contrast way over the top if you go too far. 5) My prime colouring layer is the 'hard light' layer. I just find it works for me when I have a low contrast grayscale drawing. The colour added in this step is all done on the 'hard light' layer. 6) Now I am pushing the contrast some more. I use multiply layers for shadows and overlays for highlights. The overlay layer also lets me add in some colour variety and noises to make things a little more interesting to look at. Since I worked on a low contrast grayscale, I now have the room to control my values. I have lost control of values in my early works and its a lesson Ive learned so now I am always aware and trying to be deliberate with how strong my darks and lights are. Leave nothing to chance or coincidence! Be deliberate! 7) Just continuing the previous steps into the areas I didnt colour yet. Now I flatten the layers down and work on the image on normal layers. Be aware that using overlays and all the other layers to colour an image doesnt give you a realistic light and colour look. I use this colouring grayscale method as a starting point rather than an end. So once your foundations are set, flatten it and paint on it like its a normal canvas. 8) Most of the problems are solved, the blue print is layed out. Now comes the some what tedious and long rendering process. Just paint out the forms, paint the forms of spheres, cylinders and cubes where the forms resemble those shapes. I add a strong rim light to pop the character some more. And went into the levels tab to up the contrast. 9) Again with the same old rendering. No fancy tricks. Just a round brush. A few texture overlays for the shield metal finish and colour dodge layers to the jewels glow. I used the lasso a few times to paint freely whilst keeping a solid silhouette (example in the sword). Since the layer is all flat I cut the character out of the background with the eraser to keep the edges sharp and clean. Shadow done with a single soft brush stamp mark that I skew and transform into place. But dont just leave it like that! Work into it somewhat to knit it into the character. There are darker regions where the light can not reach under his boots etc. 10) Finishing up the last few unrendered parts. Added some text and logo to accompany the piece. Finishing touches often involve applying a smart sharpen filter.
Tutorial done! This method is helpful for me because it helps me work in stages. Generally its best to work in these steps: Drawing > Value > Colour > Detail. Thinking about all of those at once is too much for me at times so this is why I find this working method useful. I have been using it recently at work and have been pleased with the results. Take the heat off your brain and break down the steps.

2 comments:
Hey Ben! thanks for another great walk through. I always learn something each time you do this. In this case, you can't imagine how the very first part you talk about (the work on the silhouette) inspired me on how to solve a problem I'm facing right now. Anyway, thanks a lot again, and please do continue to share that awesome Ben Ho wisdom. ROCK ON!
Thanks man. Really glad you found it helpful. If you have any suggestions of what to cover next then just let me know.
I think I should talk about the beginnings more rather than the polish.
Post a Comment