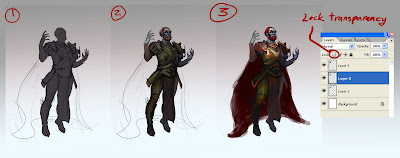
Here is a technique Ive started using more and more recently. Its focused around building the silhouette of the character (or what ever your subject is) and locking that so it becomes a mask that you can paint within. I found this liberating for my brushstrokes as I can paint loosely within the mask and keep control still as the silhouette is fixed and can not be altered unless I deliberately want to (so painting outside the shape does not show up). This is important for me because I use to paint tightly with a small brush into the details too early but with this I can be more broad and the shape will retain itself. Its always been told that painting broad first is the best approach and that getting into tiny details comes last. Now I think I found a way that helps me to do this.
First off I drew the line drawing and after that I paint on a layer beneath that with a 100% opaque brush and just fill in the lines and silhouette. Once the silhouette is as you want it you will need to lock the layer by clicking the 'Lock Transparency' icon on the layers tab. Unclicking this icon will unlock the transparency (oh yeah... make sure its a new and transparent layer before you paint otherwise the 'lock transparency' wont work). Alternatively you can paint on a flat opaque layer (with no transparency) and you use the magic wand tool to select shapes and paint onto a different layer with the selection making a stencil. Oooorrr you could use the 'alt-linking' method which I will cover in its own chapter.
So that covers the steps it took me from stage 1 and 2 on the image posted. I will cover how I got to stage 3 when I talk about alt-linking.

No comments:
Post a Comment