Righteo. Thought I might as well post this one up too since it ties into the previous tip. It might be better to read tutorial #3 before this one. Alt-linking comes after you have a layer with an opaque silhouette with the rest of that layer transparent. This trick allows you to create a new layer and link it to another layer, so that whatever you paint onto this new layer it will retain the silhouette of the layer that it is linked to. This opens up a lot of useful tricks for you to pull off.
But first... how to make an alt-linked layer. Say 'Layer A' has the silhouette you want to retain, make a new layer above it (lets call it 'Layer B'). Hold down the 'alt' key and place your cursor between the two layers, the arrow of your mouse should change into two linked circles. Click between the layers whilst the arrow of the mouse is in this linked circle form and VOILA! You have a linked layer! Now the best way I can describe how this is useful is to use an example (the above image).
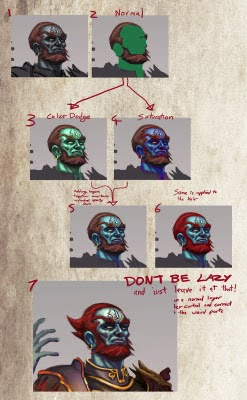
At Stage 1 I have manually painted the face but realized the colour is very dull and boring. The solution I thought was to introduce some colour to it. At Stage 2 I blocked in some green over his face (this is done on an alt-linked layer). Stage 3 and 4 shows some of the results that interested me when I toggled the layer blending options around. Just experiment! In Stage 5 I duplicated the green layer and them set to the two blending modes I liked. So now there are two layers altering the colours. The result is quite saturated so I fiddled with their layer opacity before merging the layers together. In Stage 6 I used the same technique to change the hair colour. And then my final point shown in Stage 7, DONT BE LAZY!!!! Do not just accept the results from these adjustment layers. Most of the time they can look too digital and so you should try painting over the results to correct the areas where the colours seem unnatural etc.
BONUS: Lets throw in another small trick I use in conjunction with the alt-links. When Im painting something that is looking flat in its form I sometimes create an alt-link layer and set it to overlay. Then using the radial gradient tool with a light colour (often a desaturated one) I add pockets of light values. The radial gradient's fade off reminds me of a lit sphere and gives an impression of form. Dont leave it at that though! Use it as a basis and paint over it!

2 comments:
Hey Ben! Thanks for all the latest tips and tricks. I'm listening Oh.B.Dragon, I'm listening :)
I know you are mate ;) You are always hungry for knowledge! Let me know when you drop by the UK again. Or I could come visit you guys in the Laputa castle :P
Post a Comment